How to Make a Spider Web Napkin Holder with Black Widow Design: A Step-by-Step DIY Guide
If you’re into DIY projects that blend functionality with a touch of spooky charm, then you’re in for a treat! In this tutorial, we’re diving into how to create a spider web napkin holder with a unique black widow design. This project is perfect for adding a bit of flair to your Halloween decor, impressing friends and family, or even setting up a cool item for your Etsy shop. So, let’s jump right in and break down every step you’ll need to create this eye-catching napkin holder!
Why Make a Spider Web Napkin Holder?
A custom-made spider web napkin holder not only looks great but also serves as a practical piece for organizing your napkins. Whether you’re a crafter looking to sell on Etsy or just want to spruce up your kitchen, this napkin holder brings a personal touch to your space. Plus, it’s a great way to develop your design and laser-cutting skills, especially if you’re a fan of unique and seasonal designs.
Materials and Tools Needed
Before getting started, gather the following materials:
- Laser Cutter: Essential for precise cuts.
- Plywood: 5mm thickness recommended.
- Spider Web and Black Widow Graphics: Available as free clipart online.
- Design Software: For resizing and layering graphics.
- Sandpaper: To smooth the edges after cutting.
- Wood Glue: For assembling parts.
Step 1: Prepare Your Spider Web Design
The first step is to get a spider web graphic. You can find free clipart online, but make sure it’s high quality and free for commercial use if you plan to sell your napkin holder.
- Resize the Web:
- Open your design software and import the spider web image.
- Resize it to about 150mm in width and height, which is a standard napkin size. Adjust as needed to fit your napkin dimensions.
- Adjust the Proportions:
- Aim to keep the web within 150mm x 150mm dimensions for best results. This allows it to frame the napkins without overwhelming the design.
Step 2: Add the Black Widow Design
Now, let’s bring in that black widow spider to give the holder its unique flair.
- Import the Black Widow Image:
- Import a black widow spider graphic and position it in the center of the web.
- Resize it to fit well without overwhelming the web design. Aim for around 25-50mm for the spider, depending on your preference.
- Layer and Align:
- Center the spider horizontally and vertically on the web to ensure symmetry.
- Make slight adjustments as necessary for a balanced look.
- Create an Offset:
- To give the spider an extra pop, add a small offset around the spider shape. Use about 0.25 to 0.5mm offset to make the black widow stand out without making the design too bulky.
Step 3: Adding Finger Joints
Finger joints are essential for holding the napkin holder together securely. This step requires a bit of precision, but it ensures your napkin holder is durable.
- Determine Joint Size:
- Measure the thickness of your wood (5mm in this case).
- Set the height of the joints to 5mm to match the wood thickness, and make them about 10mm wide for a snug fit.
- Align the Finger Joints:
- Place the joints at the bottom edge of your design.
- Ensure that each joint aligns perfectly with the edge of the web design for easy assembly later.
- Fine-Tune:
- After positioning the joints, zoom in to check that they slightly overlap with the main shape, ensuring a tight and secure fit.
- Double-check each joint for alignment to avoid issues during assembly.
Step 4: Create the Base
With the web and joints set, let’s move on to designing the base that will support the napkin holder.
- Draw a Rectangle for the Base:
- Create a rectangle that’s 150mm wide (to match the width of the web) and about 40mm high for stability.
- Add Finger Joints to the Base:
- Follow the same process as before to add 10mm x 5mm finger joints on the sides of the base. These will attach to the main spider web panels, keeping the structure firm.
- Align and Center:
- Align the base and the web components to make sure everything will fit together smoothly. Use alignment tools in your software to get precise placement.

Step 5: Assembly Preparation
Before cutting out your pieces, double-check the alignment and sizing. This step is crucial to avoid wasting materials.
- Group and Copy:
- Group all the parts of the spider web design, and create a mirrored copy for the other side of the napkin holder. This will give you two identical sides that sandwich the napkins.
- Prepare for Cutting:
- Make sure each component is correctly layered and aligned. Double-check the dimensions, especially the joint sizes.
- Optimize for Laser Cutting:
- If you’re using a laser cutter, set your software to the appropriate settings for 5mm plywood. Adjust speed and power as necessary to ensure clean cuts without burning the wood.
Step 6: Laser Cut the Parts
Now it’s time to cut! Load your plywood into the laser cutter and get started.
- Cut the Spider Web Panels:
- Begin by cutting the two spider web panels with the black widow design.
- Carefully monitor the cuts to ensure that the intricate details of the web and spider come out sharp.
- Cut the Base:
- Next, cut out the base rectangle and make sure the finger joints are cleanly cut.
- Check and Sand:
- Once all pieces are cut, gently sand down any rough edges or splinters. This will give your napkin holder a polished look.
Step 7: Assembly
With all the parts cut and ready, let’s bring the napkin holder to life.
- Dry Fit:
- Before applying glue, do a dry fit by putting the joints together without adhesive. Make sure everything aligns correctly.
- Apply Wood Glue:
- Once you’re satisfied with the fit, apply a small amount of wood glue to each finger joint.
- Press the pieces together firmly, wiping away any excess glue with a cloth.
- Clamp and Let Dry:
- Use clamps to hold the pieces together while the glue dries. Allow it to set for at least a few hours for a strong bond.
Step 8: Finishing Touches
Now that the holder is assembled, it’s time to give it some final touches.
- Paint or Stain (Optional):
- For a dramatic effect, paint the web black and the black widow spider red. This color scheme enhances the Halloween vibe and adds visual interest.
- Use a clear sealant to protect the wood if you’re keeping the natural look.
- Test with Napkins:
- Insert a few napkins to test the holder’s size and functionality. Make any minor adjustments if necessary.

Conclusion
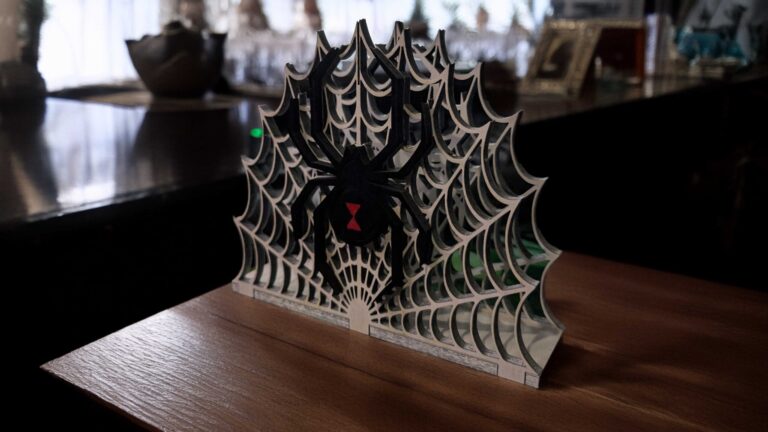
And there you have it—a striking, one-of-a-kind spider web napkin holder complete with a black widow spider design! Not only is this project a great addition to your Halloween decor, but it’s also a fantastic piece to sell on platforms like Etsy. With its unique aesthetic and practical use, it’s bound to attract attention. So, are you ready to try this project? If you found this guide helpful, don’t forget to share it with other DIY enthusiasts, and feel free to subscribe for more tutorials like this. Happy crafting!